How to descale a Keurig is important as it has to do with the process of removing calcium deposits, or scale, that can build up inside a coffee maker over time.
Calcium and scale are non-toxic but left unattended, they can hinder your brewer’s performance.

So cleaning When Keurig has some steps to take to do it, you click the button on your Keurig coffee maker, and you receive a sluggish dribble instead of a delightful brew.
That’s when you know it’s time to pamper your faithful coffee lover by describing it. Descaling may appear to be a hard process but don’t worry, we’re here to walk you through it step by step.
How to Descale a Keurig Coffee Maker
Here are some easy Steps that will take you less than 10 minutes to finish up; follow these steps, and you’ll be able to describe a coffee maker in no time.
1. Unplug and Empty Your Keurig
First and foremost, safety! Unplug your Keurig coffee maker and allow it to cool. Remove the water reservoir and any remaining water in the drip tray.
2. Disassemble and Clean
Disassemble any removable parts, such as the drip tray, K-cup holder, and water reservoir. To eliminate any coffee remnants, wash these components in warm, soapy water.
3. Check for Clogs
Next, inspect the exit needle (the small puncture needle that pierces the K-cups) for any obstructions.
Clear any debris that may be blocking it with a paperclip. To avoid injuring the needle, take extreme precautions.
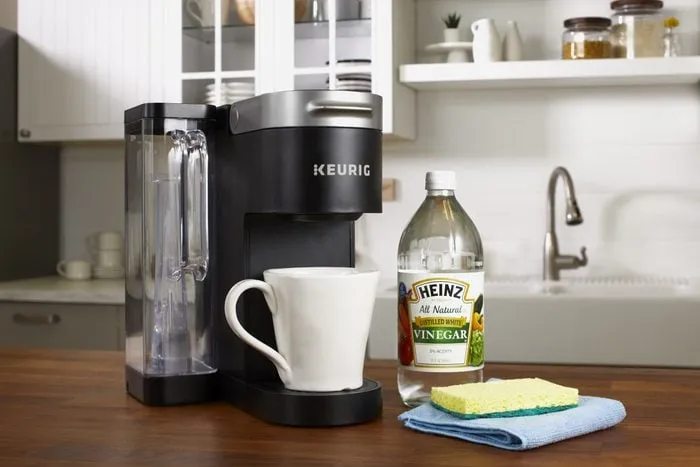
4. Prepare the Descaling Solution
Mix a solution of half white vinegar and half water in your sink. Make enough to fill the water reservoir.
5. Descaling Process
Now, we get to the meat of the issue. Fill the reservoir with the vinegar-water solution. Start a brew cycle without inserting a K-cup in a ceramic mug on the drip tray.
This cycle is critical for descaling the machine’s internal components.
6. Brew and Dump
Allow your Keurig to finish the brewing cycle. The vinegar-water solution will pass through your coffee maker, assisting in the dissolution of mineral deposits.
When the cycle is ended, empty the mug and restart the operation with the same mug.
7. Let it Sit
After a few cycles, let your Keurig sit for around 30 minutes to allow the descaling solution to do its work.
This pause allows the vinegar to break down any remaining mineral deposits.
8. Rinse with Freshwater
After waiting, carefully rinse the reservoir and refill it with new water. Run numerous brew cycles with just water (no K-cup) until you can’t smell or taste vinegar in your coffee any longer.
This step guarantees that the descaling solution is completely flushed out.
9. Wipe Down and Reassemble
Wipe the outside of your Keurig down with a moist cloth or sponge. Reassemble all of the components you removed previously.
How to Clean Your Keurig Coffee Maker

The importance of this cleaning protocol is determined according to the frequency of use for your brewer; however, it is necessary to do this at least once a week when daily coffee drinking.
Materials you’ll need are; a Keurig 3-month maintenance kit (contains decalcification solution, rinse pods, cleaning tablets, and filters), a Big ceramic coffee cup, Non-abrasive cleaning rags, Dish soap, Water
Step 1: Wipe Down the Exterior
Wipe down the outside of your brewer carefully using a soft cloth that has been dampened.
Step 2: Scrub the Plate and Drip Tray
Take care not to spill any extra liquid that may have been within the drip tray when you slide it out. Clean the drip tray by hand, and then use a fresh, moist cloth to wipe the plate.
Step 3: Clean the Reservoir
Take off the top and water reservoir, give them a hand wash, and then rinse.
If your machine has a water filter, be sure to remove it before cleaning the reservoirs inside with a cloth. You don’t want to leave any lint inside. Instead, let the reservoir air dry.
Step 4: Use a Water-Only Cycle
It’s a good idea to run a water-only brew to flush the system after cleaning the reservoir and the outside.
To do this, put a large mug on the drip tray and fill the now-clean reservoir with water. Brew only water on the maximum size setting (no K-Cup).
Another way to accomplish this is to use a Keurig Rinse Pod in place of a K-Cup.
Importance of Descaling you Keurig
After going into the specifics of descaling, let’s discuss why it’s so important. Mineral deposits from the water you use (such as calcium and lime) accumulate in your Keurig’s internal system over time.
These deposits can block your machine, resulting in delayed brewing, off-flavors, and, finally, a broken coffee machine.
Descaling is the process of eliminating these tenacious mineral deposits and restoring your Keurig to its former beauty.
How can you know when you need to descale your Keurig? Keep a watch out for the following warning signs:
1. Water flow is slow.
2. Incomplete brewing cycles
3. Coffee with an unusual flavor
4. Smaller cup size
5. Unusual sounds
6. Error messages or blinking lights
If your Keurig displays any of these signs, it’s time to describe it.
Daily Tips for Regular Coffee Maker Maintenance
After making cups of cocoa, tea, or concoctions like soup, pour an additional cup of cold water into a mug. By doing this, you can clean the filter area and remove any remaining sugars before using it again.
Use filtered water in the reservoir rather than water directly from the tap if your machine needs to be cleaned more frequently or if your water is hard.
Empty the reservoir and switch off your single-serve coffee maker if you’re going on vacation or won’t be using it for a long time.
How do I clean a glass coffee pot? Use only natural cleaners like vinegar and a couple of tablespoons of salt. If there are any internal burnt-on coffee stains or patches, the salt will act as a scrub.
Descaling your Keurig coffee maker may appear to be a difficult task. Still, it is a simple and important maintenance routine to keep your beloved coffee partner in good working order.
With a little white vinegar, water, and patience, you can say goodbye to slow, sputtering brews and fully enjoy your morning coffee.
For years, your Keurig will thank you with excellent cups of coffee.